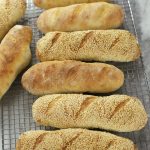
Sourdough Sub Rolls
These Sourdough Sub Rolls, also called hoagie rolls, sandwich rolls, or sandwich buns, are everything a great sandwich bread should be. They are flavorful and soft with a chewy interior that is strong enough to hold your favorite fillings without falling apart. Made using my Easy Sourdough Starter, they have a mild tang and delicious flavor. Rustic, satisfying, and the kind of bread that makes any sandwich feel a little more special.
Servings 8 Rolls
Calories 378kcal
Ingredients
- 200 grams Easy Sourdough Starter
- 25 grams granulated sugar
- 435 grams warm water (105-115℉)
- 670 grams all purpose Flour
- 20 grams salt
- 35 grams oil *avocado or olive oil
Instructions
Mixing the Dough
- In a large bowl, weigh and combine the sourdough starter, sugar, and warm water. Stir until the starter is mostly dissolved.Note: Remember to tare the scale before weighing your ingredients.
- Add the flour and salt, then mix until most of the flour is incorporated.
- Add the oil and continue mixing until a rough, shaggy dough forms. Cover the bowl with lightly greased plastic wrap and let it rest at room temperature for 45 minutes.
Stretch and Fold
- Tip: Dip your fingers in water first to prevent sticking during stretch and folds.After the dough has rested, take one side and gently stretch it upward, then fold it over the center. Turn the bowl slightly and repeat, working your way around the dough for about one minute.
- Cover the bowl again and let the dough rest for 30 minutes. Repeat this stretch, fold, and rest process a total of four times. This helps build strength in the dough and improves the texture of the rolls.
Fermentation
- After the final stretch and fold, let the dough rest and ferment until it has noticeably risen, ideally by about half or nearly double in size. At room temperature, this typically takes between six and eight hours, depending on the ambient room temperature. For a slower fermentation and deeper flavor, you can refrigerate the dough and let it proof for about twelve hours. See Note #1 below.
Preshaping of the Rolls
- Tip: If you refrigerate the dough during fermentation, let it warm up to room temperature before shaping. This makes the dough easier to work with and helps create better texture in the finished rolls.
- Turn the proofed dough onto a lightly floured flat surface.
- Gently pinch the edge of the dough, then pull and fold it into the center a few times to firm up the dough before dividing.
- Divide the dough into 8 equal portions that weigh approximately 170 grams each.
- Working with one dough ball at a time, roll into a rough cylinder.
- Repeat with the remaining pieces, then cover lightly and let rest for 30 minutes. See Note #2 below
Final Shaping and Rise of the Rolls
- Preheat oven to 425℉.
- Place one dough piece on a lightly floured surface and using your fingertips, gently flatten into a rough rectangle.
- Starting with the long end, roll the bottom edge (closest to you) up toward the center.
- Roll the dough away from you, tucking as you go to build tension and form a tight log.
- Once fully rolled, gently pinch the seam closed along the bottom.
- Roll it back and forth to even out the shape, aiming for about 7–8 inches long.
- Place seam-side down on a parchment-lined baking sheet (or lightly greased enameled cookie sheet).
- Repeat with remaining dough. Cover and let rest for an additional 30 minutes.
Scoring and Baking
- After the final 30-minute proof, the rolls should look puffy but still hold their shape when gently touched.
- Use a sharp blade or lame to score by either 1) making one lengthwise slash down the center of each roll, about ¼ inch deep, holding the blade at a slight angle or 2) Make 3–4 shallow diagonal cuts across the top of each roll, spaced evenly. Tip: Lightly oiling your blade helps to prevent the dough from sticking while scoring.
- Bake in a preheated 425 on the center rack for 14-16 minutes or until golden brown. Cool completely before cutting. See Note #3 below.
Video
Notes
Note #1- First fermentation at room temperature usually takes six to eight hours, depending on the strength of your starter and how warm your kitchen is. Warmer temps and a strong starter speed things up, while cooler kitchens may need more time. Look for dough that has risen by about half, feels airy, and shows bubbles. (When making this recipe I usually let the dough ferment at room temperature over night and then bake in the morning. )
After cold fermentation, the dough often needs about four hours at room temperature to both warm up and finish proofing, especially if it didn’t fully rise in the refrigerator.
Note #2- Preshaping your dough and letting it rest for 30 minutes helps the gluten relax, which makes the final shaping much easier and smoother. It also gives you better control over the dough’s shape and helps create surface tension so the rolls don’t flatten out. In the end, you get rolls that look better, bake more evenly, and have great structure for holding fillings.
Note #3- For the best golden-brown crust, bake one cookie sheet at a time, leaving a few minutes between batches to help the oven recover heat and maximize oven spring. If baking two sheets at once, be sure to rotate them halfway through for even baking.
Nutrition
Calories: 378kcal | Carbohydrates: 72g | Protein: 9g | Fat: 5g | Saturated Fat: 0.5g | Polyunsaturated Fat: 2g | Monounsaturated Fat: 3g | Trans Fat: 0.02g | Sodium: 971mg | Potassium: 90mg | Fiber: 2g | Sugar: 3g | Vitamin A: 2IU | Calcium: 13mg | Iron: 4mg