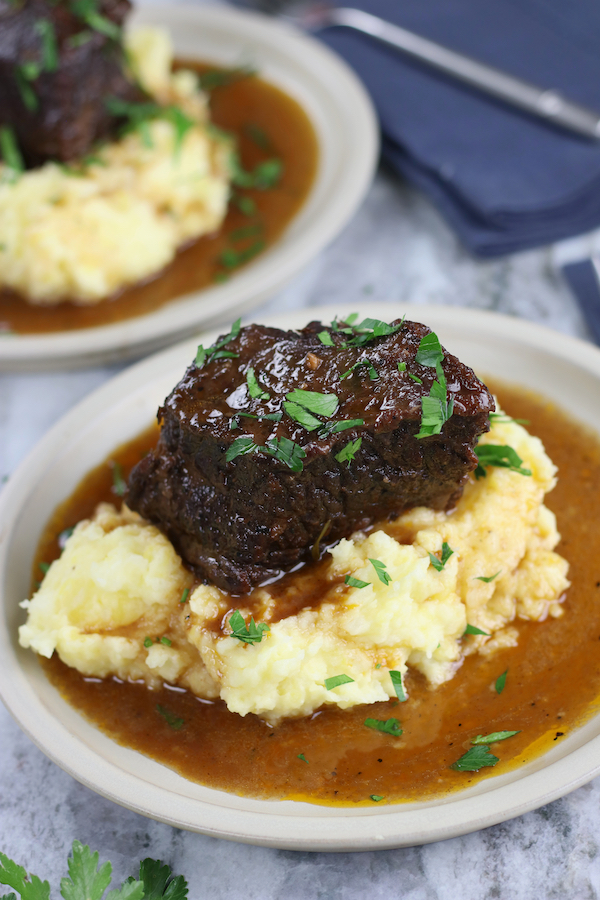
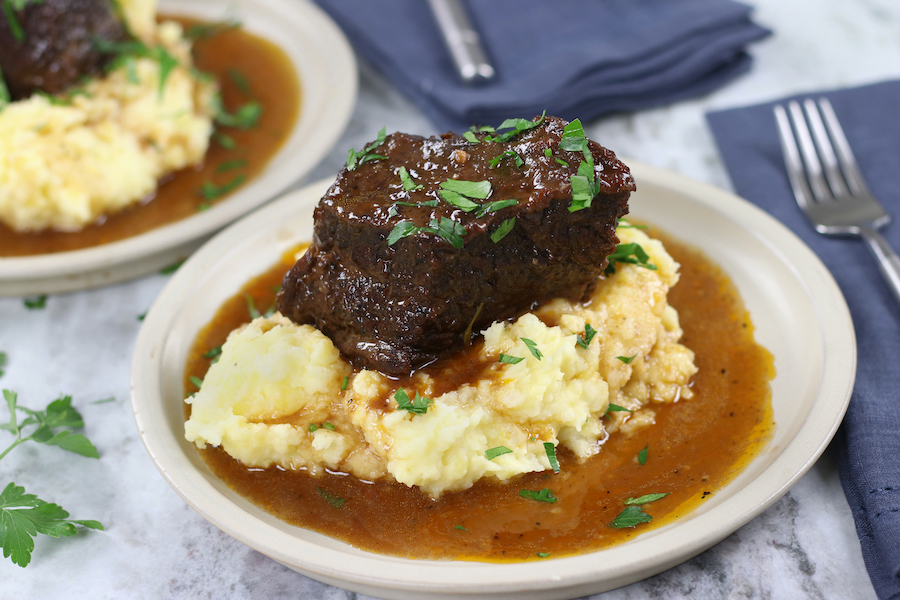
Red Wine Braised Short Ribs
Red wine braised short ribs have melt-in-your-mouth tender beef with a rich red wine sauce. This hearty, savory, and indulgent dish is perfect companion for mashed potatoes, creamy polenta or butter noodles.
This post may contain affiliate links which I earn a small portion in sales if a purchase is made. Rest assured though, it is never at any additional cost to you.
When To Serve Wine Braised Short Ribs
Red wine braised short ribs may sound fancy, but they’re surprisingly easy to make at home. The melt-in-your-mouth tender meat and rich wine sauce means these ribs make the ultimate comfort food for any celebration or chilly night in.
- Around the holidays, wow your guests by braising up short ribs for a cozy Christmas dinner.
- Valentines Day or an anniversary? Impress your special someone with homemade short ribs paired with creamy polenta and candlelight.
- Birthdays and celebrations call for a special meal, so elevate the menu with slow-braised short ribs.
- Even a movie night or family dinner becomes a little more luxurious with fork-tender braised ribs.
Whenever the craving for comfort food strikes, short ribs braised in red wine delivers satisfaction. The aromas of garlic, red wine and herbs will make your home smell amazing too.
Secrets For Amazingly Flavorful Beef Short Ribs
- English Cut Short Ribs– This cut of meat has a lot of connective tissue that breaks down into tender, flavored meat during long braising. Additionally, the marrow and collagen in the bones imparts a rich, meaty taste to the ribs as they braise.
- Salting– Salting either right before searing or a day in advance enhances the flavor and tenderizes the meat.
- Searing– Browning the ribs over high heat to caramelize the exterior adds an amazing depth of flavor.
- Aromatics– Sautéing diced veggies like onion, carrot, and celery helps to create an aromatic foundation that infuses the braise with sweetness and depth.
- Depth of flavor– Garlic, tomato paste and herbs layers the sauce with savory and bright flavors.
- Braising– The act of slow cooking in liquid tenderizes the tough meat while allowing the flavors to marry.
- Homemade Stock– If at all possible use homemade stock. The extra gelatin gives the sauce a thicker, richer and more luxurious texture. Additionally, with homemade stock there is no artificial flavors or MSG added. Pro Tip: To make a store bought stock feel similar to homemade, sprinkle 1 teaspoon of unflavored gelatin over the top of the broth and let sit for a few minutes before adding to sautéed vegetables.
- Quality Red Wine– The acidity helps to cut through the rich meatiness while imparting bold and complex flavors.
English Cut Short Ribs
English cut short ribs come from a specific part of the cow – the chuck section near the ribs. This area contains a good amount of marbling and connective tissue. The marbling provides flavor and moisture, while the connective tissue is what makes the ribs perfect for braising.
When the ribs are braised for a long period of time, the connective tissue breaks down into gelatin. This is what gives the ribs their succulent, melt-in-your-mouth texture after cooking. The gelatin also helps thicken and enrich the braising liquid into a luscious sauce.
In addition to connective tissue, English cut short ribs contain a rib bone. This adds even more flavor as the ribs braise. The bone simmers in the braising liquid and imparts amazing flavor into the sauce.
Look for short ribs that are about 1-2 inches thick with generous marbling when selecting ribs for braising. The thickness allows for the low and slow cooking that is needed to break down the connective tissue.
Overall, the high collagen content in English cut short ribs means they become extremely tender and flavorful after braising for 2-3 hours. Their rich, beefy taste pairs wonderfully with red wine, herbs and vegetables. For the best braised short ribs, English cut is the way to go.
Where to Buy English Cut Short Ribs
Visit a full-service butcher shop for high-quality English cut short ribs. Tell the butcher you need:
- 1-2 inch thickness
- Good marbling
- No large fat chunks
- English style custom cut
Explain to the butcher it is for braising and they can hand select the right ribs for you.
Well-stocked grocers like Whole Foods or Sprouts also have them. Check the specialty meats section or call ahead to request the cut if needed.
Tools Needed
- Sided Cookie Sheet with Rack– Used for salting the ribs, the rack lifts the ribs off the bottom of the pan so the salt can contact all surfaces of the meat evenly. This ensures even seasoning and curing. Additionally, the rack allows air to circulate under and around the ribs as they cure.
- 7-8 Quart Dutch Oven– To brown the salted short ribs and braise them in the oven. Another option would be a 11-12 inch stainless steel skillet pan with a lid.
- Tongs– For transferring the ribs once seared.
- Fine Mesh Strainer– Needed to strain the braising liquid to remove vegetables and herbs.
- Large Measuring Cup– To strain braising liquid into.
Ingredients Needed
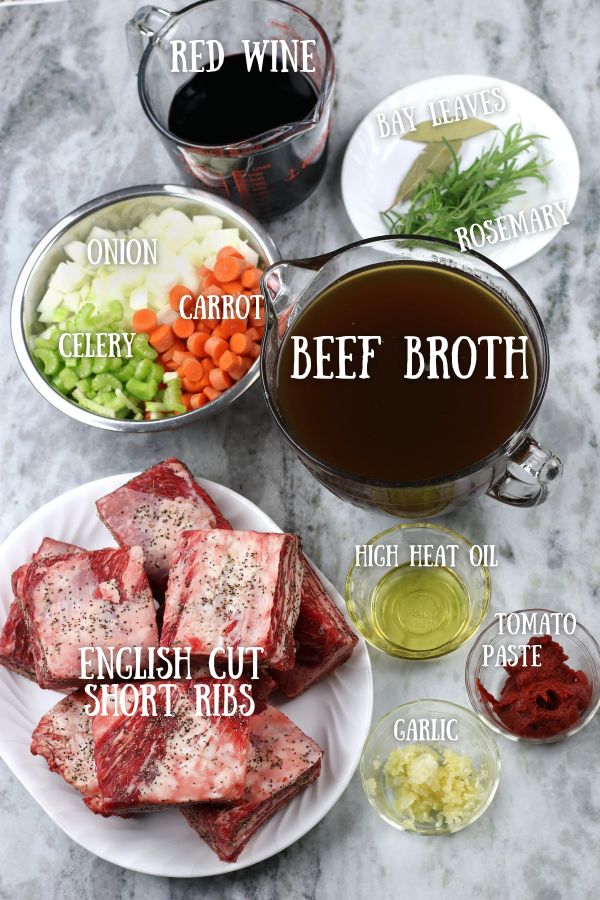
- English Cut Short Ribs– This cut provides marbling, collagen, and an amazing beefy flavor.
- Salt and Pepper– Seasons the meat and enhances flavor.
- High Heat Oil– Browns the meat which adds a richness and depth of flavor.
- Brown Onion, Carrot and Celery– Adds a wonderful depth of flavor to the braising sauce. (See section directly below.)
- Garlic– Provides an aromatic punch and depth of flavor.
- Tomato Paste– Brings in a layer of mild acidity which is a tasty contrast to the other ingredients.
- Red Wine– Imparts a bold richness to the sauce.
- Beef Broth– Lends a savory and meaty flavor to the braising liquid.
- Bay Leaves and Rosemary– Brings in an aromatic and herbaceous flavor.
What is Mirepoix: Why It Is Important
Mirepoix is a flavor base of chopped carrots, celery, and onions sautéed in fat. When used after braising short ribs, mirepoix provides aromatic vegetables that add sweetness, depth, and complexity to the dish.
Sweating the mirepoix first builds a solid foundation of flavor before adding the wine when braising. As it simmers in the braising liquid, the mirepoix breaks down further and infuses the sauce and meat with incredible flavor over long cooking.
Red Wine vs Beef Broth
The liquid used to braise short ribs provides moisture, flavor, and body. An all-wine braising liquid will impart bold, complex wine flavors and develop a rich, silky sauce. However, wine lacks the gelatin, proteins, and nutrients of stock or broth.
Alternatively, braising solely in beef broth contributes deep savory notes but lacks the acidity and fruitiness of red wine. The ideal liquid combines both red wine (about 1.5-2.5 cups for 5-6 lbs of meat) and beef broth (5-6 cups) to marry the flavors.
The broth also prevents the wine from overpowering this dish. For the most balanced, nuanced sauce, braising short ribs in a mix of quality red wine and homemade beef stock is recommended.
Adjusting the ratios caters the flavor profile. But neither an all-wine nor all-broth braising liquid provides the layered notes a thoughtfully blended combination achieves.
Short Rib Silver Skin – Keep or Discard?
There are some differing opinions among chefs on whether to remove the silver skin (the thin and opaque membrane on the bone side of short ribs that is very tough and chewy), from short ribs before braising:
- Most chefs recommend removing it – They argue the membrane never fully braises tender and creates an unpleasant texture. Removing it allows the meat to braise properly. This is the majority opinion.
- Some old school chefs leave it on – They claim the membrane helps hold the meat together during the long braise. Leaving it intact prevents the meat from falling apart too much.
- Compromise is to score it – Scoring or cutting the membrane in a cross-hatch pattern helps the braising liquid penetrate while still keeping the ribs intact.
- Regard fat cap separately – The layer of fat on the non-bone side should generally be left intact for moisture and flavor.
- Personal preference prevails – Some people don’t mind the texture while others find it unpalatable. If leaving on, people can remove it themselves after cooking if desired.
So in summary, most experts recommend removing the membrane, but there is some flexibility based on personal tastes.
How To Make
Salting the Ribs
- Dry ribs with paper towels and remove the silver skin from the bone side of the rib.
- Salt snd pepper all sides of the ribs and lay flat in a single layer on a sided cookie sheet lined with a rack. Refrigerate overnight or up to 24 hours. Note: It is ok to sear immediately after salting.
Searing the Ribs
- Heat a dutch oven or large stainless steel skillet pan over medium-high heat with oil. Working in batches sear ribs on all sides.
- Remove ribs and set aside. Pour off excess grease leaving behind 2-3 tablespoons.
Preparing the Braise
- Preheat oven to 325℉.
- Keeping the pan on the same medium-high heat, add the roughly chopped onion, carrots and celery. Sauté until lightly browned, about 5-7 minutes.
- Add garlic and tomato paste. Cook stirring constantly until vegetables are coated and turn a deep red color, about 5 minutes.
- Stir in wine and deglaze pan by scraping up the fond (brown bits of flavor) sticking to the bottom of the pot. Stir in beef broth.
- Transfer beef back in pot. Add bay leaves and rosemary.
- Bring to a simmer and then cover and transfer to oven. Cook for 1 hour, remove pan from oven and flip ribs. Cover and cook for an additional hour or until ribs are tender.
Making the Sauce
- Transfer ribs to a platter and cover with aluminum foil.
- Strain sauce through a fine mesh strainer and discard veggies.
- Add liquid back to pot and reduce over medium heat, about 10-15 minutes. Spoon excess fat from surface of sauce and then taste test to see if additional salt or pepper is needed.
- Add beef back to pan to reheat, about 3-5 minutes.
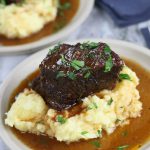
- Serve over mashed potatoes, buttered noodles or creamy polenta.
Salting Meat In Advance
- Salting meat in advance draws out moisture through osmosis, then allows the meat to re-absorb some of that moisture along with the seasoned salt. This enhances flavor and tenderizes the meat.
- For short ribs, salting a full day ahead provides time for the salt to thoroughly penetrate the thicker cut of meat.
- Sprinkle salt generously over all surfaces of the short ribs. About 1 teaspoon kosher salt or 1/2 teaspoon fine sea salt per pound is a good guideline.
- Chilling the salted short ribs in the fridge overnight allows time for the salt to work its magic.
- Pat the short ribs dry before searing to remove excess moisture that could inhibit browning.
- The salted surface will brown and sear, leading to a crusty exterior and tender, well-seasoned interior when the ribs are cooked.
Covering After Salting
When salting meat in advance, there are a couple schools of thought on whether to cover it or leave it uncovered in the fridge:
- Leaving short ribs uncovered allows for greater moisture evaporation which concentrates flavor. However, this can lead to some surface drying.
- Covering the salted short ribs keeps the exterior moist and protected. However, it limits moisture loss so salt penetration may be decreased.
A good middle ground would be to leave the salted ribs uncovered for the first 4-12 hours, then cover them for the remainder of the 24 hour salting time. This allows for some moisture loss initially but prevents the meat surface from fully drying out.
Additionally, placing the uncovered salted ribs on a wire rack set over a baking sheet improves air circulation and drainage as moisture is pulled out. The ribs should not be sitting directly in any accumulated liquid.
Storage and Reheating
Preparing a Day in Advance
- Remove ribs from braising liquid and allow to cool slightly before storing.
- Store ribs and braising liquid in serrate air tight containers.
- The next day the fat will rise to the surface of the braising liquid and will be solidified.
- Remove the solidified fat and discard.
- Reheat gently either on the stovetop over medium-low heat or baked in a 350°F oven. This will bring the ribs up to temperature slowly to maintain moisture and prevent drying out.
- Cook just until heated through, about 15-20 minutes. Don’t overcook.
Storing Leftovers
- Allow the ribs to cool in the braising liquid before storing. Transfer to airtight containers with the liquid.
- Refrigerate for up to 4 days. The flavor develops even more over time. Skim solidified fat before reheating.
- Reheat gently either on the stovetop over medium-low heat or baked in a 350°F oven. This will bring the ribs up to temperature slowly to maintain moisture and prevent drying out.
- If the liquid separates when reheating, whisk in a splash of beef stock to smooth it out.
- Add water or stock if the sauce is too thick after reheating.
- Cook just until heated through, about 15-20 minutes. Don’t overcook.
Frozen Leftovers
- Frozen ribs keep well for 2-3 months. Divide into portion sizes and freeze with some braising liquid.
- Thaw frozen ribs overnight in the fridge before reheating.
- Reheat gently either on the stovetop over medium-low heat or baked in a 350°F oven. This will bring the ribs up to temperature slowly to maintain moisture and prevent drying out.
- If the liquid separates when reheating, whisk in a splash of beef stock to smooth it out.
- Add water or stock if the sauce is too thick after reheating.
- Cook just until heated through, about 15-20 minutes. Don’t overcook.
Frequently Asked Questions
What is the difference between searing and braising?
Here’s a quick overview of the key differences between braising and searing:
Searing:
- Involves cooking the surface of the meat quickly over fairly high heat.
- Creates a caramelized, brown crust on the outer surface of the meat.
- Typically done just before braising or roasting as a way to enhance flavor.
- Cooks very fast, usually just 2-3 minutes per side.
Braising:
- Involves cooking meat slowly in liquid, usually an aromatic broth/stock.
- Helps break down tough cuts and makes them tender.
- Uses moist indirect heat around 300-325°F.
- Takes much longer, often braising for 1-3 hours.
- Flavors the entire piece of meat, not just the surface.
- The liquid braising liquid becomes a sauce.
So in summary, searing is a quick, high-heat method to brown meat while braising is a long, moist cooking method to tenderize and flavor meat completely. Using both methods is what helps to create these amazingly flavorful and tender ribs.
Should the pan be covered or uncovered while braising?
Yes, generally speaking it is best to cover the pan with the lid while braising the short ribs. However, I have seen some chefs use a parchment paper lid, which allows more steam to escape and shortens the amount of time reducing the braising liquid later.
What types of red wine work best?
The key is using a dry red that is full bodied but not too tannic or oaky. Avoid very expensive wine as medium, or even lower price ranges offer great quality for braising. Here are a few options:
- Cabernet Sauvignon – This full-bodied red has nice acidity and bold fruit flavors that complement the beef. A classic choice.
- Merlot – Merlot brings cherry and plum notes and soft tannins to balance the rich ribs.
- Malbec – Deep ripe fruit flavors like plum and dark cherry work well with short ribs. Affordable too.
- Zinfandel – Jammy berry flavors and black pepper spice pairs nicely. Not too tannic.
- Syrah/Shiraz – Full tannins provide structure and peppery flavor to the sauce.
- Blends like Bordeaux – Blends balance light and heavy notes in the wine and ribs.
Are there other herbs that can be used in place of rosemary?
Rosemary pairs incredibly well with beef. However, here are a few more options:
- Thyme– Provides an earthy and aromatic flavor.
- Oregano– Brings a touch of brightness with some subtle peppery flavor.
- Marjoram– Has a delicate and sweet herbaceous flavor.
Can Chicken stock be used in place of beef broth?
Chicken stock can be substituted, but beef broth is ideal. The beefy flavor better complements and enhances the short ribs.
If my braising liquid does not reduce enough, how do I thicken it to a more sauce like consistency?
Here are a few options to thicken the braising sauce if it has not reduced enough.
- Make a slurry by mixing 1/2- 1 tablespoon cornstarch with an equal amount of water. Stir it into the simmering sauce until thickened.
- Make a paste of 1 tablespoon of softened butter with 1 tablespoon of flour. Stir it into the simmering sauce until thickened.
- Puree vegetables from the braise and stir them back in to act as a natural thickener.
Is it normal for the bones to fall off the meat?
Yes, it is very normal and in fact shows that the ribs are done.
How should the braised ribs be served?
Here are some ideas for serving red wine braised short ribs:
- Plate the short ribs with the braising liquid spooned over the top as a sauce. Garnish with fresh herbs.
- Serve over creamy polenta or mashed potatoes to soak up the delicious braising sauce.
- Nestle the tender meat over oven-roasted root vegetables like carrots, turnips or rutabagas.
- Pair with egg noodles, gnocchi or buttery spaetzle to complement the rich, beefy ribs.
- For a starch-free option, serve with a simple green salad or roasted asparagus.
- Garnish with gremolata (minced parsley, lemon zest, garlic) for a fresh contrast to the rich ribs.
- Include a side of crusty bread for dipping in the incredible sauce.
- Portion the ribs onto a plater, rather than served family-style from the braising pan.
- Accompany with a full-bodied red wine like Cabernet Sauvignon or Malbec.
The key is highlighting the succulent, fall-off-the-bone meat with sides that work with the delicious wine-enriched sauce.
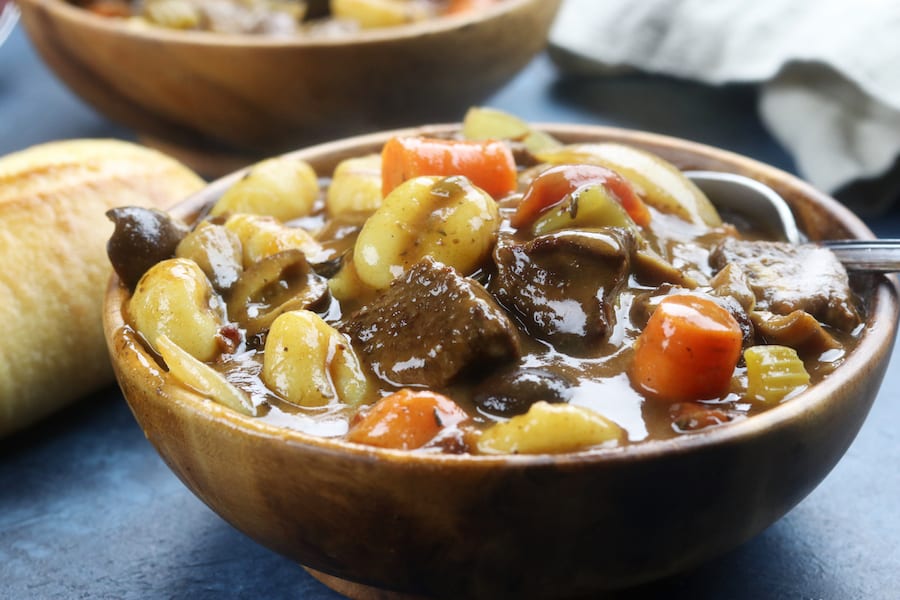
More Comfort Classics
Pork Spare Ribs and Sauerkraut
Red Wine Braised Short Ribs
Ingredients
- 5 pounds bone-in short ribs (English style cut short ribs) *see Note #1 below
- salt and pepper
- 3 tablespoons high heat oil *such as avocado oil
- 1 large brown onion *roughly chopped
- 1 large carrot *roughly chopped
- 1 large celery stalk *roughly chopped
- 6 large garlic cloves *minced or crushed
- 3 tablespoons tomato paste
- 2 1/2 cups red wine *see Note #2 below
- 5-6 cups beef broth
- 2 bay leaves
- 2 fresh rosemary sprigs
Instructions
Salting the Ribs
- Dry ribs with paper towels and remove the silver skin from the bone side of the rib. See Note #1 below for step by step instructions.
- Salt snd pepper all sides of the ribs and lay flat in a single layer on a sided cookie sheet lined with a rack. Refrigerate overnight or up to 24 hours. Note: It is ok to sear immediately after salting if short on time.
Searing the Ribs
- Heat a dutch oven or large skillet pan over medium-high heat with oil. Working in batches sear ribs on all sides, approximately 2-3 minutes per side.
- Remove ribs and set aside. Pour off excess grease leaving behind 2-3 tablespoons.
Preparing the Braise
- Preheat oven to 325℉.
- Keeping the pan on the same medium-high heat, add the roughly chopped onion, carrots and celery. Sauté until lightly browned, about 5-7 minutes.
- Add garlic and tomato paste. Cook stirring constantly until vegetables are coated and turn a deep red color, about 5 minutes.
- Stir in wine and deglaze pan by scraping up the fond (brown bits of flavor) sticking to the bottom of the pot. Stir in beef broth.
- Transfer beef back in pot. Add bay leaves and rosemary.
- Bring to a simmer and then cover and transfer to oven. Cook for 1 hour, remove pan from oven and flip ribs. Cover and cook for an additional hour or until ribs are tender.
Making the Sauce
- Transfer ribs to a platter and cover with aluminum foil.
- Strain sauce through a fine mesh strainer and discard veggies.
- Add liquid back to pot and reduce over medium heat, about 10-15 minutes. Spoon excess fat from surface of sauce and then taste test to see if additional salt or pepper is needed. See Note #3 and #4 below.
- Add beef back to pan to reheat, about 3-5 minutes.
- Serve over mashed potatoes, buttered noodles or creamy polenta.
Video
Notes
- Place rib bone-side up. Locate white membrane covering it.
- Start peeling up membrane at one end using fingers. Note: A small knife may be needed to begin lifting the skin.
- Grip freed edge and slowly pull membrane off, peeling it away from meat.
- Keep peeling back until entire membrane is fully removed.
- Discard membrane. Rinse rib and pat dry.
- Cabernet Sauvignon – This full-bodied red has nice acidity and bold fruit flavors that complement the beef. A classic choice.
- Merlot – Merlot brings cherry and plum notes and soft tannins to balance the rich ribs.
- Malbec – Deep ripe fruit flavors like plum and dark cherry work well with short ribs. Affordable too.
- Zinfandel – Jammy berry flavors and black pepper spice pairs nicely. Not too tannic.
- Syrah/Shiraz – Full tannins provide structure and peppery flavor to the sauce.
- Blends like Bordeaux – Blends balance light and heavy notes in the wine and ribs.
- Remove ribs from braising liquid and allow to cool slightly before storing.
- Store ribs and braising liquid in serrate air tight containers.
- The next day the fat will rise to the surface of the braising liquid and will be solidified.
- Remove the solidified fat and discard.
- Reheat gently either on the stovetop over medium-low heat or baked in a 350°F oven. This will bring the ribs up to temperature slowly to maintain moisture and prevent drying out.
- Cook just until heated through, about 15-20 minutes. Don’t overcook.
- Make a slurry by mixing 1/2- 1 tablespoon cornstarch with an equal amount of water. Stir it into the simmering sauce until thickened.
- Make a paste of 1 tablespoon of softened butter with 1 tablespoon of flour. Stir it into the simmering sauce until thickened.
- Puree vegetables from the braise and stir them back in to act as a natural thickener.