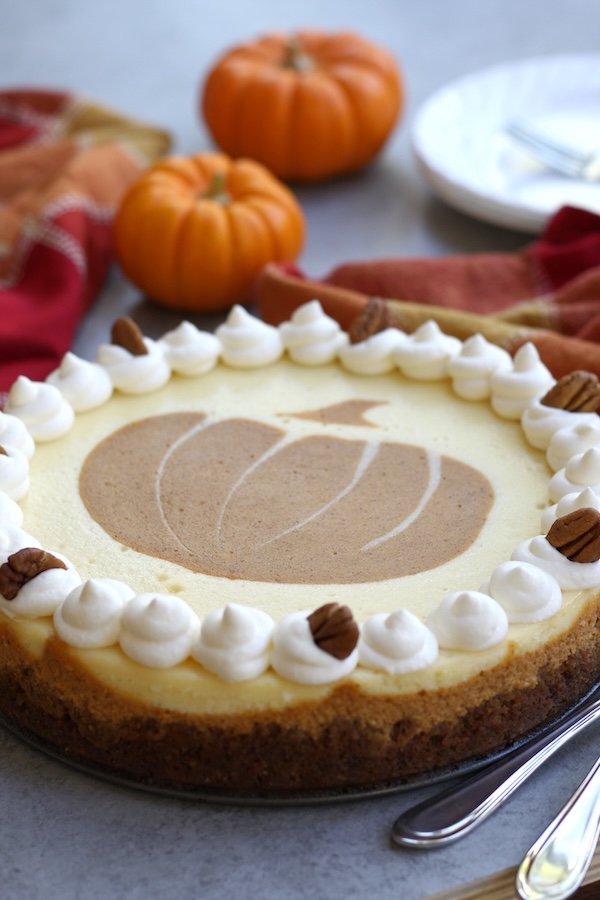
Double Layer Pumpkin Cheesecake
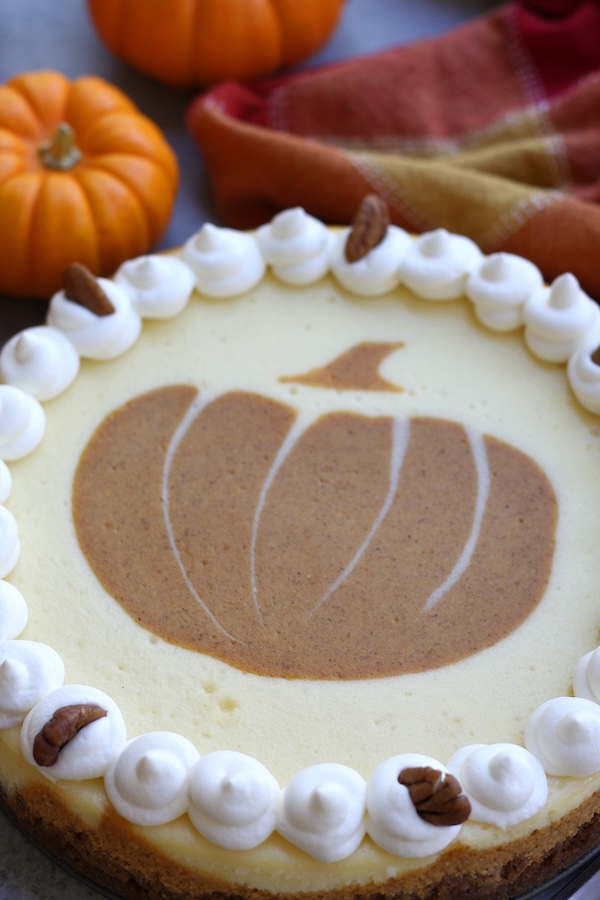
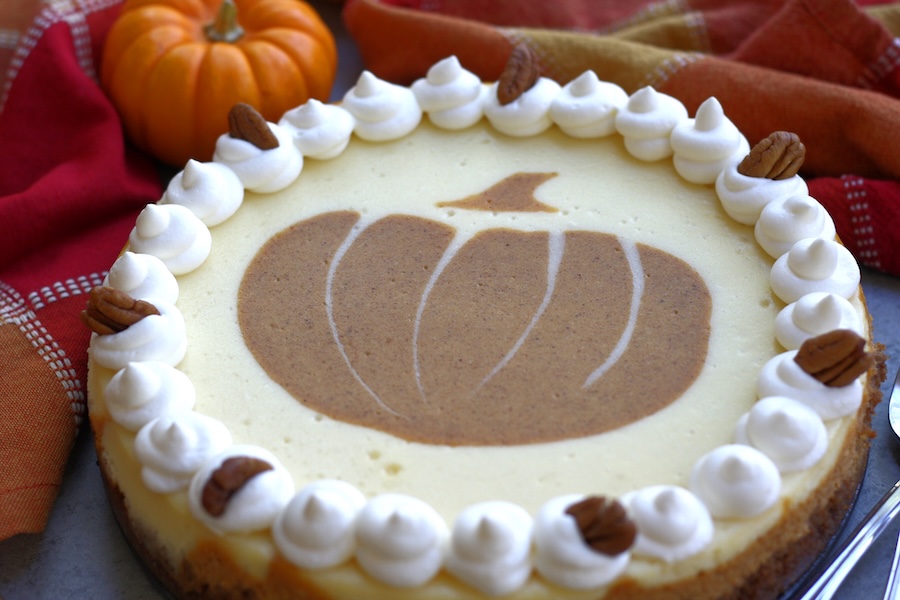
Double layer Pumpkin Cheesecake is a rich and creamy showstopper that combines classic vanilla cheesecake with spiced pumpkin on a buttery gingersnap-pecan crust. With its gorgeous two-tone layers of cheesecake and irresistible fall flavors, it’s the kind of dessert that steals the spotlight at Thanksgiving, Friendsgiving, or any holiday gathering.
This post may contain affiliate links, meaning I earn a small commission if you make a purchase—at no extra cost to you. Additionally, AI was used to assist with spelling, grammar, sentence clarity, and creative brainstorming.
Why You’ll Love This Double Layer Pumpkin Cheesecake
I grew up loving this silky Old Fashioned Cream Cheese Pie, but cheesecake always felt too dense. That is, until I tasted my cousin Niki’s unforgettable Pumpkin Cheesecake. That’s when cheesecake became holiday magic to me.
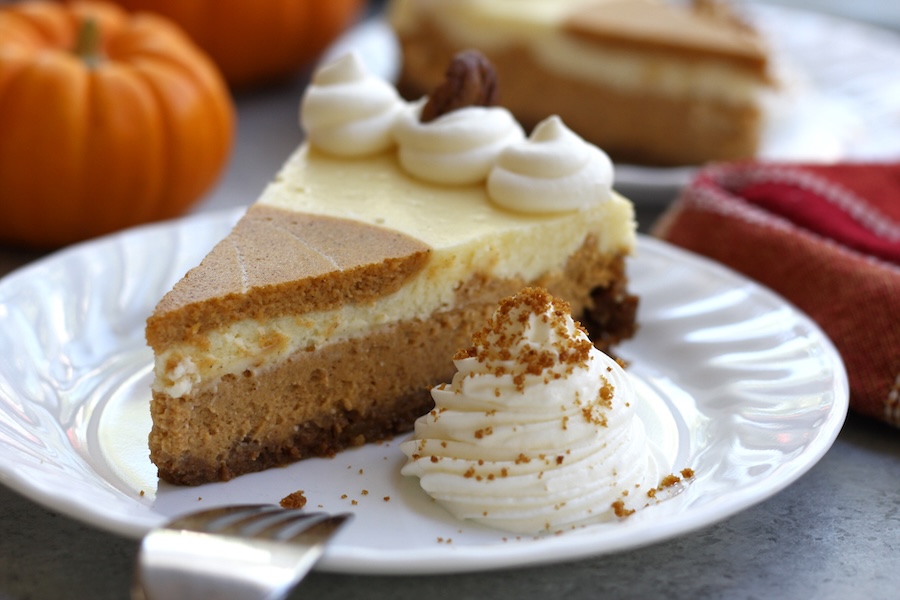
That same magic is what makes this Double Layer Pumpkin Cheesecake so special. It has all the cozy spices of pumpkin pie with the creamy indulgence of cheesecake. The gingersnap-pecan crust adds just the right crunch, while the alternating layers of vanilla and pumpkin create a show-stopping slice. It’s festive enough for the holiday table, yet simple enough that even beginner bakers can succeed with it.
Ingredients You’ll Need
This Layered Pumpkin Cheesecake uses a few simple ingredients that come together to create a dessert that’s creamy, spiced and absolutely holiday-worthy. Here’s what makes it special:
Crust Ingredients
- Gingersnap Cookies– Brings warm spice and a crisp base that pairs beautifully with pumpkin.
- Graham Crackers– Adds balance to the bold gingersnap flavor and gives the crust structure.
- Pecans– Minced nuts add a buttery crunch and nutty depth.
- Butter– Holds the crust together and add richness.
- Salt– Sharpens the flavors and keeps the crust from tasting flat.
Cheesecake Layers Ingredients
- Cream Cheese– The foundation of any cheesecake, providing a smooth, tangy base.
- Sugar– Sweetens the filling and balances the tang of the cream cheese.
- Eggs-Binds the layers and creates a rich, custard-like texture.
- Vanilla Extract– Adds warmth and rounds out the flavor.
- Heavy Cream– Keeps the cheesecake luxuriously creamy.
- Pumpkin Puree– Delivers classic holiday pumpkin flavor and autumn color.
- Cinnamon and Nutmeg– Essential pumpkin pie spices that infuse cozy warmth.
- Whipped Cream (for garnish)– Lightens each slice and makes the presentation festive.
Pro Tips for a Perfect Cheesecake
Preparing the Crust
- Pack Crust Tightly– Press the gingersnap and graham cracker crust firmly into the pan so it holds together when sliced. A flat- bottom measuring cup works perfectly for this.
Mixing the Batter
- Soften Cream Cheese Fully– Take it out the night before or give it several hours at room temperature. Cold cream cheese won’t blend smoothly and can leave lumps in your batter.
- Scrape Bowl Often– After each addition of ingredients, stop and scrape the sides and bottom of the mixing bowl. This ensures a silky batter with no streaks of cream cheese hiding in the mix.
- Add Eggs One at a time– Beat gently and scrape the bowl between each addittion. Over mixing can whip in too much air, which causes cracks later.
Setting Up the Pan
- Double (or even triple) Wrap Your Springform Pan– Use heavy-duty foil with the shiny side facing out. This protects the crust from water seeping in during the water bath.
Baking
- Bake in a Water Bath– Place your wrapped springform pan inside a larger roasting pan with 1/2 to 3/4 inch of very hot tap water (about 150-160℉/ 65-70℃). This gentle, even heat prevents the cheesecake from baking too quickly and cracking.
Cooling and Chilling
- Leave in Oven– Once the cheesecake is baked, turn off the oven and crack the door. Let it rest in the oven for 30-40 minutes. This gentle cool down allows the cheesecake to settle slowly, preventing sudden temperature changes that often lead to cracks on the surface.
- Cool Gradually– After resting in the oven, transfer the cheesecake to the countertop and let it cool completely at room temperature, about 2-3 hours. Rushing this step can shock the custard-like filling and cause the texture to tighten or the top to crack. Slow cooling ensures a silky, smooth cheesecake that set beautifully once chilled.
- Chill Thoroughly– Refrigerate for at least 6 hours before serving. Overnight is even better, giving the flavors time to develop and the texture to set beautifully.
Clean Slicing
- Loosen with a Hot, Dry Knife– Before removing the springform ring, run a knife dipped in hot water (and wiped dry) around the edges. This releases the cheesecake cleanly for picture-perfect slices.
- Tip for Picture Perfect Slices– When slicing, keep a tall glass of hot water and a clean towel nearby. Dip and dry your knife between every cut for slices that look bakery-perfect.
How To Make
Making a Layered Pumpkin Cheesecake may feel intimidating, but if you take it step by step, it’s completely doable. Here’s exactly how to make it:
Make the Crust
Start by pulsing the gingersnap cookies and graham cracker separately in a food processor until fine crumbs form. Transfer them to a mixing bowl, then pulse the pecan until minced and almost crumb-like. Add pecans to the crumbs and stir in melted butter and salt. Press this mixture firmly into a greased 9- or 10-inch springform pan. Packing the crust tightly is what helps it hold together when sliced. A flat-bottom measuring cup works perfectly here. Bake the crust at 350℉ for about 12-14 minutes, until the edges are just golden. Set aside to cool.
Prepare the Cheesecake Batter
Reduce the oven to 300℉. In a stand mixer set on low speed, beat the softened cream cheese with the sugar until perfectly smooth. (Tip: take the cream cheese out the night before so it blends lump-free.) Stop often to scrape down the bowl. This prevents streaks of unmixed cream cheese from hiding in your batter. Add eggs one at time, mixing gently on low and scraping the bowl after each addition. Over mixing at this stage can whip in too much air, which leads to cracks. Finally, beat in the vanilla extract and heavy cream until fully incorporated.
Layer and Swirl
Remove half the batter and set aside. To the remaining add pumpkin puree, cinnamon and nutmeg, and mix until smooth. Spread half of this pumpkin batter over the cooled crust. Gently pour the plain cheesecake batter on top, then spoon the remaining pumpkin batter in your preferred pattern. Swirl with a knife if you’d like a marbled look, or follow the instructions in the note section of the recipe card below for creating the pumpkin design on top.
Bake in a Water Bath
Double (or even triple) wrap the bottom of the springform pan in heavy-duty foil, shiny side out, to prevent leaks. Place the pan inside a larger roasting pan and pour in 1/2 to 3/4 inch of very hot tap water (about 150-160℉). The steam creates a gentle, even heat that keeps the cheesecake creamy and prevents cracking. Bake for 1 hour, until the top is set but the center still has a slight jiggle.
Cool Slowly
Turn off the oven, crack the door and let the cheesecake rest inside for 30-40 minutes. This gradual cooldown helps the custard settle without cracking. Next, transfer the cheesecake to the countertop and let it cool completely at room temperature, about 2-3 hours. Rushing this step can shock the filling, so patience is key.
Chill Thoroughly
Once the cheesecake has cooled, cover and refrigerate for at least 6 hours, but preferably overnight. This gives the flavors time to meld and the texture to set into that classic creamy consistency.
Finish and Serve
Before removing the springform ring, run a hot, dry knife around the edges to release the cheesecake cleanly. For the picture-perfect slices, keep a tall glass of hot water and a clean towel nearby. Dip and dry the knife between every cut.
Frequently Asked Questions
How do I keep my cheesecake from cracking?
To prevent cracks, always use softened cream cheese and mix on low speed so you don’t whip in too much air. Scrape the bowl often, add eggs one at a time and bake in a water bath for gentle, even heat. Let the cheesecake cool slowly (first in the oven with the door cracked, then on the counter) before chilling for at least 6 hours.
Do I need to use a water bath?
Yes, a water bath is the best way to make a creamy, crack-free cheesecake. The hot water creates steam and keeps the oven temperature gentle and even, which prevents the filling from drying out. Without it, cheesecakes are more likely to over bake and develop deep cracks.
Can I make Pumpkin Cheesecake ahead of time?
Yes, Pumpkin Cheesecake is the perfect make-ahead dessert. Bake it the day before, let it cool completely and refrigerate overnight so the flavors develop and the texture sets. It will keep well in the fridge for up to 4-5 days, making it ideal for Thanksgiving or holiday gatherings.
How long should cheesecake chill before serving?
Cheesecake needs to chill for at least 6 hours before serving, but overnight is best. This extra time allows the filling to fully set and the flavors to deepen, giving you a smooth, creamy texture and clean slices.
What is the best way to know when the cheesecake is done?
Pumpkin Cheesecake is done when the edges are set but the center has a slight jiggle when gently nudged. The top should look matte, not shiny. Avoid over baking as the cheesecake will continue to set as it cools and chills.
Can Pumpkin Cheesecake be frozen?
Yes, Pumpkin Cheesecake freezes beautifully. Cool it completely, then wrap the whole cheesecake or individual slices tightly in plastic wrap and foil. Freeze for up to 2 months. Thaw overnight it the refrigerator before serving for the best texture and flavor.
What if I don’t have a springform pan?
If you don’t have a springform pan, you can bake Pumpkin Cheesecake in a deep pie dish or square baking pan. Line the pan with parchment and leave an overhang to lift the cheesecake out once chilled. Baking time may vary. A shallower cheesecake will usually bake a little faster, while a deeper pan may take slightly longer. Use visual cues instead of the clock: the edges should be set and the center should still have a slight jiggle when gently nudged.
What’s the difference between a marbled cheesecake and the pumpkin design?
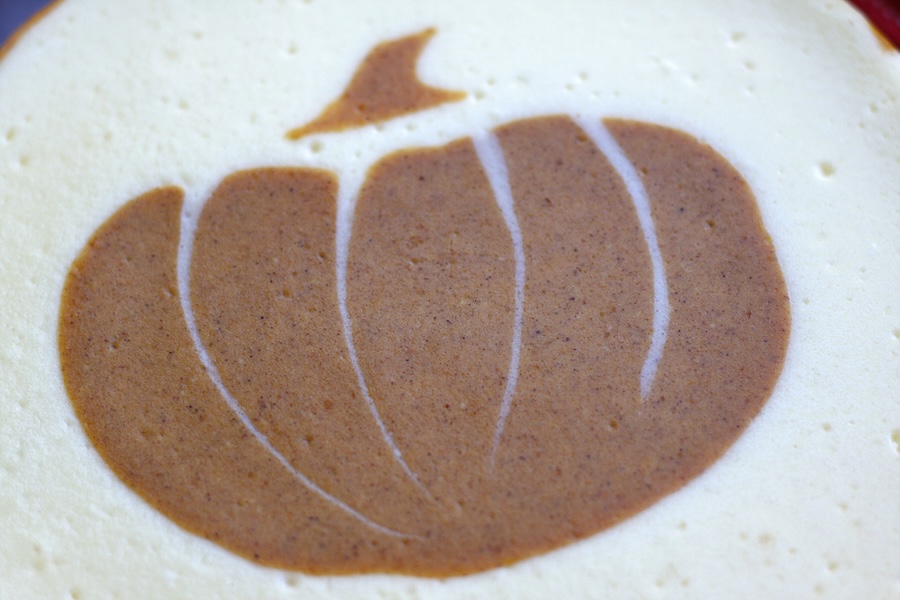
A marbled cheesecake is made by swirling the pumpkin and vanilla batters together with a knife to create a blended, marble effect. The pumpkin design uses reserved pumpkin batter that’s spread with a serving spoon and finished with knife strokes to form the shape of a pumpkin on top. Both styles taste the same. It’s just a matter of whether you prefer a rustic marbled look or a festive pumpkin design for your holiday table.
More Delicious Pumpkin Recipes
Thanksgiving Recipes You’ll Love
Double Layer Pumpkin Cheesecake
Ingredients
For the Crust
- 2 cups ground Ginger snaps *about 7 ounces or 20-22 cookies
- 1 cup ground Graham crackers *about 4 ounces or 7 full sheets
- ½ cup minced Pecan pieces
- ½ cup butter *melted
- ½ teaspoon salt
For the Cheesecake Layers
- 3 8 oz packages of cream cheese *room temperature (24 oz total)
- 1 ¼ cups granulated sugar
- 3 large eggs *room temperature
- 2 teaspoons vanilla extract
- ¼ cup heavy cream
- 1 ¼ cup pumpkin
- 1 ½ teaspoons cinnamon
- 1 teaspoon nutmeg
- whipping cream for garnish
Instructions
- Preheat oven to 350℉
- In a food processor, pulse the cookies and graham crackers separately until fine crumbs form. Transfer to a mixing bowl. Add pecans to the food processor and pulse until minced and almost crumb-like. Add the pecans to the bowl with the crumbs and stir to combine.
- Mix cookie mixture with melted butter and salt. Press mixture firmly into a greased 9- or 10-inch springform pan (use a flat-bottom measuring cup for best results). Bake 12–14 minutes, until edges are golden. Set aside to cool.
- Lower oven temp to 300℉. In a stand mixer on low speed, beat softened cream cheese and sugar until smooth, scraping the bowl often. Add eggs one at a time, mixing on low and scraping between each addition. Mix in vanilla and heavy cream until fully combined.
- Remove half the batter and set aside. To the remaining batter, add pumpkin, cinnamon, and nutmeg; mix until smooth. Spread half the pumpkin batter over crust, pour plain batter on top, then add remaining pumpkin batter. Swirl gently with a knife for a marbled effect. Want a pumpkin design instead of marbling? Check note #1 below for step-by-step tips.
- Wrap the outside of springform pan with 2–3 layers of heavy-duty foil, shiny side out. Place pan inside a larger roasting pan and add ½–¾ inch hot water (150-160℉). Bake 1 hour, until top is set and center is slightly jiggly. See Note #2 below.
- Turn off oven, crack door, and leave cheesecake inside 30–40 minutes. Remove and cool on countertop until completely cool, about 2–3 hours.
- Refrigerate at least 6 hours, preferably overnight, before serving.
- Before removing springform ring, run a hot, dry knife around the edges. For clean slices, dip and dry knife between each cut.
Video
Notes
Reserve a little pumpkin batter after layering. Using a large serving spoon with rounded edges and a square shape, drag three spoonfuls of batter across the top:
- First stroke – a rainbow-shaped arc across the top.
- Second stroke – a matching arc in the opposite direction along the bottom.
- Third stroke – drag through the center to fill in the pumpkin.
Nutrition
Cutest pie ever!
Thank you so much Shelley. I wish I could take all the credit but this was my cousin’s awesome creation.
For this recipe does the butter need to be melted when making the crust or just room temperature?
Good morning Lorraine. I apologize that I did not see your question last night. Yes, it is melted butter. I appreciate you calling attention to this and will update the recipe. Thank you!
Can you freeze it after it’s baked?
Hi Carmela,
That is such a great question. Yes we have frozen individual pieces in storage containers for about 2 weeks. Unfortunately I haven’t frozen the whole the cheesecake so I don’t know how the appearance will hold up although I am sure it will still taste wonderful.
My goodness this is a beautiful dessert and looks like a fantastic Thanksgiving dessert I would love to try. But my big question is, how did you create the pumpkin design on top of the cheese cake? Thank you!
Thank you Kylie! This is my cousin’s creation and I was blown away by it not only how beautiful it is but tasty too. The video at the top of the page shows the main highlights of the creating of the pumpkin. You will probably get a better explanation from it than I could ever do. I hope you enjoy!
Hi. I found your layered pumpkin cheesecake video on YouTube and was mesmerized! And I’m so happy to find your food blog. I’m planning to execute your recipe tomorrow. I’m curious about your cooling methods once the cheesecake is baked. Would you mind sharing your strategy? Thank you in advanced 🙂
I am so happy you asked about the cooling because I realized that I did not include that within the post. After baking I allow the cheesecake to cool completely at room temperature and then cover it loosely with plastic wrap before refrigerating.
I hope you enjoy!
Pumpkin cheesecake is the best and I love the pumpkin pattern! I have to try that!
Thank you Tanya! That is so sweet! I appreciate you.
Adorable! Was a template used to make the pumpkin design on top? Sorry if I you mentioned that/I happened to miss it if it was listed – Thanks
Thank you Mari! My extremely talented cousin came up with idea and the video shows how she created it. The best way is to use a large serving spoon. I hope this helps.
Can I just buy it from you? This is too hard.
I understand. If you find the pumpkin a little too challenging you can always make a marbled cheesecake.