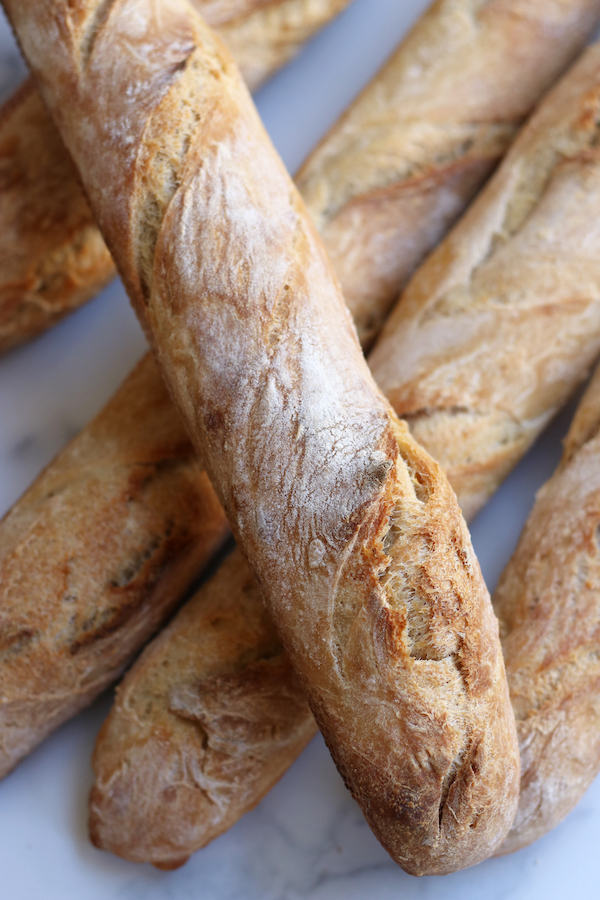
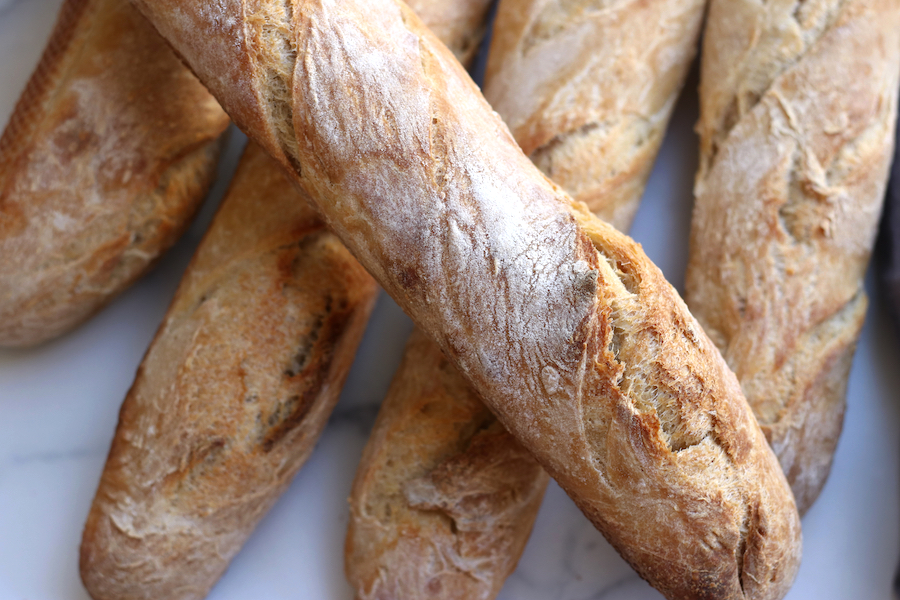
Sourdough Baguettes
Artisan homemade Sourdough Baguettes are so much easier to make than they seem. This recipe makes baguettes with a gorgeous crusty exterior and a fluffy interior. Use these Baguettes to make breadcrumbs, croutons, sandwiches or just enjoy them by themselves.
This post may contain affiliate links which I earn a small portion in sales if a purchase is made. Rest assured though, it is never at any additional cost to you.
Why Make Homemade Sourdough Baguettes
We all know the popularity of sourdough skyrocketed in 2020. It seemed like everyone was jumping on the homemade sourdough bandwagon. It’s now 2021 and life is slowly getting back to normal and with that the popularity of homemade sourdough is starting to decline. So why would anyone want to learn how to make Homemade Sourdough Baguettes? This is an incredibly important question for anyone struggling with Hoshimotos.
My recent diagnosis of early onset Hoshimotos opened up a whole new world of information. I was fortunate enough to find the work of Dr Alan Christianson and his Thyroid Reset Diet. Through his work I learned that many cases of Hoshimotos can be reversed by reducing excess dietary iodine. I also learned that processed grains (aka store bought bread) is a huge culprit for adding in excess iodine. That information empowered me to dive head first into making my favorite bread homemade.
Ingredients and Tools Needed

- Large bowel– This is for the mixing and proofing the dough. I use the largest and second largest from this set.
- All-Purpose White Flour– Use good quality flour. Also rye, whole wheat, spelt and kamut flours may be used in this recipe.
- Filtered Water
- Salt- This is my all time favorite for both cooking and as a finishing salt because of the low iodine content.
- Sourdough Starter
- Kitchen Scale– I highly recommend weighing the ingredients verses trying to measure them. Weighing creates much more consistent results.
- Chopstick– Makes stirring the sourdough starter easier.
- Dough Scraper
- Dough Cutter
- Bread Lame– To score the bread.
- Plastic Wrap
- Cooking Spray– Love this healthier cooking spray.
- Baguette Pans– These pans allow for good air flow, helping the baguettes to achieve a crispy crackly crust.
How To Make
Day 1 Instructions
- Start with a good quality Sourdough Starter. Making your own will take approximately 1 week.
- Weigh flour (1,000 grams) and water (770-780 grams) into a large mixing bowl. Stir until well combined. Cover with plastic wrap and let rest for 45 mins. This step is called autolyse and in short it makes for a better quality final product with minimal effort.
- To the mixing bowl add by weight 20 grams of salt (I prefer the taste of 25 grams) and 150 grams of sourdough starter. Pro Tip 1: If a little extra starter is added (10-20 grams) the bread will still turn out beautifully.
- Using hands mix ingredients until fairly well combined. Cover and let the dough rest for 30 minutes.
- After the resting period gently pinch the edge of the dough, pull it towards the center and fold into center of the bowl. Do this for approximately 1 minute, working around the circumference of the bowl. Cover and let rest for 30 minutes.
- Repeat step 5 a total of 4 times.
- Let the dough sit at room temperature (65-74℉) to proof for approximately 12 hours or until dough has doubled in size and bubbles have formed. Pro Tip 2: Cooler temperatures of 60℉ will take longer to proof (14 hours or more). Warmer temperatures of 80℉ will take a shorter amount of time to proof (3 hours or more).
Day 2 Instructions
- Preheat oven to 425℉ for at least 30 minutes before baguettes are baked.
- Lightly flour a flat surface. Using a dough scraper remove the dough from the bowl and place onto lightly floured surface.
- Cut dough into 4 equal parts using a dough cutter.
- Spray baguette pans with cooking spray.
- Form the dough into long loaves (see Shaping Baguettes below).
- Transfer loaves onto baguette pans. Cover with sprayed plastic wrap and let rest for 20 minutes. Pro Tip 3: Spraying one side of the plastic wrap will prevent the dough from sticking to the wrap.
- Score the dough by lightly dragging the edge of a small knife or bread lame over the top of the dough. Make 4-5 cuts at an angle down the length of the bread. Pro Tip 4: This step helps more steam to escape and the dough to expand.
- Bake for 30-35 minutes or until baguettes are golden brown. Pro Tip 5: Dough that has a higher moisture content may take 5-10 minutes longer of baking time. Because of this, it is important to keep a watchful eye on the baguettes at around the 25 minute marker and on.
- MOST IMPORTANT STEP!!!! Once the bread is baked, turn off the oven, leave baguettes in the oven but leave the oven door ajar by about 1 inch and let the baguettes sit in the oven for 20 minutes. This step helps to create the crispy crackly bakery style crust.
- After the 20 minutes remove baguettes from pan and let cool completely on cooling racks. However, we can never control ourselves and usually devour 1 loaf while it is still warm.
Shaping Baguettes
There are 2 main methods of shaping the dough into a baguette.
- The first method can be seen here.
- For the second approach use both hands on opposite sides of the dough. Gently pull the sides and make small folds into the center of the dough, working down the length of the dough. Repeat this 1-2 more times until the dough is 14-15 inches in length and has an even thickness. Pro Tip 6: For areas of the dough that has extra thickness, use both hands and apply a slight bouncing tension to that area (see video for visual).
Baking for a Artisan Crispy Crust
There are 4 tips to achieving a crispy crackly artisan sourdough baguette.
- Use quality ingredients.
- Preheat the oven for at least 30 minutes before baking.
- Use baguette pans. Not only do they help in keeping the baguette shape, the wholes in the pan allow for proper air flow around the bread.
- Most importantly, leave baguettes in the oven with door ajar for 20 mins after baking. This is the final step to achieving the seductive crackle.
Troubleshooting
Dense Loaves
In short, problems with sourdough turning out dense often boils down to the health of the sourdough starter. The starter should be well feed, bubbly and room temperature when added to the dough.
Adding Too Much Water or Starter
It isn’t uncommon when adding the water or starter to accidentally add 5-10 grams extra of each. If this does happen do not fear. Sourdough is a very wet type of dough and the extra moisture is handled well by the baguettes. The most challenging part will be handling the proofed dough as it will be stickier. However, well flouring the surface will make handling the stickier dough easier.
Proofing Times
Depending on the time of the year proofing times will vary. During the winter months our house becomes very chilly, often dipping down to the low 60’s. Because of this the proofing time does extend past 12 hours. In the spring and fall, when temperatures are more moderate, proofing takes approximately 12 hours at room temperature. However, the heat of summer is very much felt in our house and consequently the dough rises much quicker. In short, the time of year and/or internal temperature of your house will greatly determine proofing times.
Is Pre-shaping Necessary
Pre-shaping is the forming of the dough into balls after the proofing is completed. It is followed by a resting period of 20-30 minutes and then the dough is formed into loaves. Its purpose is to add strength to the dough, or in other words a tighter loaf. Pre-shaping is very much needed when making round sourdough, aka boule. However, for making baguette bread with the use of baguette pans, pre-shaping is not needed.
If you enjoyed these Sourdough Baguettes please let me know by leaving a comment and review below. Doing so helps to encourage others to make the recipe also. Thank you!

Sourdough Baguettes
Ingredients
- 1000 grams all purpose flour *plus extra for dusting
- 770 grams water
- 20 grams salt
- 150 grams Sourdough Starter
Instructions
Day 1
- In a large bowl weigh flour and water. Stir until well combined. Cover with plastic wrap and let rest for 45 mins.
- To the bowl add salt and sourdough starter. Using hands mix ingredients until fairly well combined. Cover and let the dough rest for 30 minutes.
- After the resting period gently pinch the edge of the dough, pull it towards the center and fold into center of the bowl. Do this for approximately 1 minute, working around the circumference of the bowl. Cover and let rest for 30 minutes. Repeat this step a total of 4 times.
- Let the dough sit at room temperature (65-74℉) to proof for approximately 12 hours or until dough has doubled in size and bubbles have formed.
Day 2
- Preheat oven to 425℉ for at least 30 minutes before baguettes are baked.
- Lightly flour a flat surface. Using a dough scraper remove the dough from the bowl and place onto lightly floured surface.
- Cut dough into 4 equal parts using a dough cutter. Spray baguette pans with cooking spray.
- Place both hands on opposite sides of the dough of cut dough. Gently pull the sides and make small folds into the center of the dough, working down the length of the dough. Repeat this 1-2 more times until the dough is 14-15 inches in length and has an even thickness. For extra thick areas of the dough use a slight bouncing tension to that area with both hands.
- Transfer shaped dough onto baguette pans. Cover with plastic wrap and let rest for 20 mins. (Before covering the dough spray one side of the plastic wrap with cooking spray to prevent sticking to the dough.)
- Score the dough with 4-5 angled cuts up the length of the loaf.
- Bake for 30-35 minutes or until baguettes are golden brown.
- Turn off oven but leave baguettes in the oven with the door ajar for 20 mins. (This will create the crispy crackly bakery style crust.)
- Remove loaves from oven and baguette pans. Let cool completley before storing. Store in an airtight bag or container. Can be frozen for up to 3 months. Defrost at room temperature fully before use.
Video
Notes
- There are approximately 6-8 serving per baguette, 118 calories per serving.
- See Pro Tips within post for additional tips and tricks.
Nutrition


Your detailed instructions were so helpful and essential for making this recipe. The bread turned out so great. There is nothing better than freshly baked homemade bread.
That is wonderful to hear! Thank you so much!
I’m still confused as to how much AP flour to use? 6 grams seems like so little for 24 baguettes when I change the qty. can you confirm how much flour to use ?
Hi Danielle. I can understand the confusion. Can you guide me to where is says 6 grams of flour? I am seeing the recipe card showing 1,000 grams of all purpose flour.
Thank you so much. I want to make sure there are no typos because that is very confusing.
Can the baguettes be baked on a deep cookie sheet if I do not have the baguette baking pan?
Thank-you
Hi Lynn. Absolutely you can use a cookie sheet. The baguette pans are helpful in creating that gorgeous crackly exterior but I wouldn’t turn down one baked on a cookie sheet. Yum!
I have made this recipe three times and it is OUTSTANDING!!!!!
Thank you so much Kimmie. I very much appreciate this!!
I don’t know why it only says four stars in my previous post!!!!! It’s a 5 out of 5 star recipe for sure!!! I’m so sorry about that!!! My fingers! Ugh!!!
Hi , I have followed the recipe exactly and I seem to have a very, very wet dough. Is this normal? I’m used to wet dough but this seems impossible to handle and shape. Any tips?
Hi Amelie. Thank you for reaching out, and I completely understand your concern. It’s normal for sourdough baguette dough to be quite wet since it’s a high-hydration dough, which contributes to its beautiful crust. Here are a few tips that can help:
After the bulk fermentation, transfer the dough onto a lightly floured surface and perform several stretch and folds to tighten it up before dividing. This technique helps to build structure and tension in the dough.
Additionally, using a bench scraper can be really helpful for lifting and folding the dough without it sticking to your work surface.
If you have any more questions or need further assistance, feel free to ask!
Is it possible to freeze the dough? What stage would be best? I have been tasked with making baguettes for a large wedding 5 hours from home and am curious if it would be possible to make the dough ahead to take and bake.
Hi Dana. Thank you so much for your question. While you can freeze sourdough baguette dough, the texture and rise can be tricky to manage after thawing. For a large event like a wedding, I recommend pre-baking the baguettes to about 80-90% of the way through the bake (until they are just starting to turn golden but still pale). Let them cool completely, then wrap tightly in plastic wrap or foil and freeze.
On the day of the event, take the frozen baguettes straight from the freezer and finish baking them at 400°F (200°C) for about 10-15 minutes, or until they’re golden brown and crisp. This method ensures you get that fresh-baked, crispy crust without the worry of the dough losing its quality during freezing.
I hope this helps and that it is smooth sailing in planning for the wedding.
Does your starter need to be active? Or can you use discard?
Hi Kris. I highly recommend to use active starter for the baguettes. Inactive discard works best in recipes where the rise isn’t essential, as it won’t have much leavening power. Think along the lines of pancakes, waffles, crackers, flatbreads, or even cookies—recipes that benefit from the flavor but don’t rely on the starter’s lift. The tangy, slightly sour notes can add a unique depth to these types of baked goods!
I have made many times. Love them! But wondering if I can put the dough in the fridge after proofing if I can’t bake immediately.
Thank you Brooklyn so much for your kind words. I’m thrilled you love the baguettes! Yes, you can absolutely refrigerate the dough after proofing if you’re not ready to bake. Just cover it well to prevent it from drying out and bake it straight from the fridge when you’re ready. It might need a few extra minutes in the oven, but the flavor will be just as wonderful!
I followed recipe and my dough is away to dry can I just keep adding water or perhaps sourdough discard
Hi Tim! Thank you so much for giving the baguettes a try. With the proportions in this recipe the dough is naturally on the wetter side, usually around 75 to 80 percent hydration, so it should not be dry at all. Most bakers actually find it a little sticky to handle. If your dough feels stiff or dry, the most common cause is extra flour sneaking in, either from measuring with cups instead of grams or from adding too much flour during mixing. If it does feel dry, add just a teaspoon of water at a time during the stretch and folds. For best results, weigh your ingredients with a scale and expect the dough to feel tacky, which is completely normal for this style of baguette.
Made these ones before they came out perfect made a second time great, but this time they were wheat Came out perfect Ty
Thank you so much Earl! I love hearing that. So glad they turned out great both times and it’s awesome that the wheat version worked perfectly too!