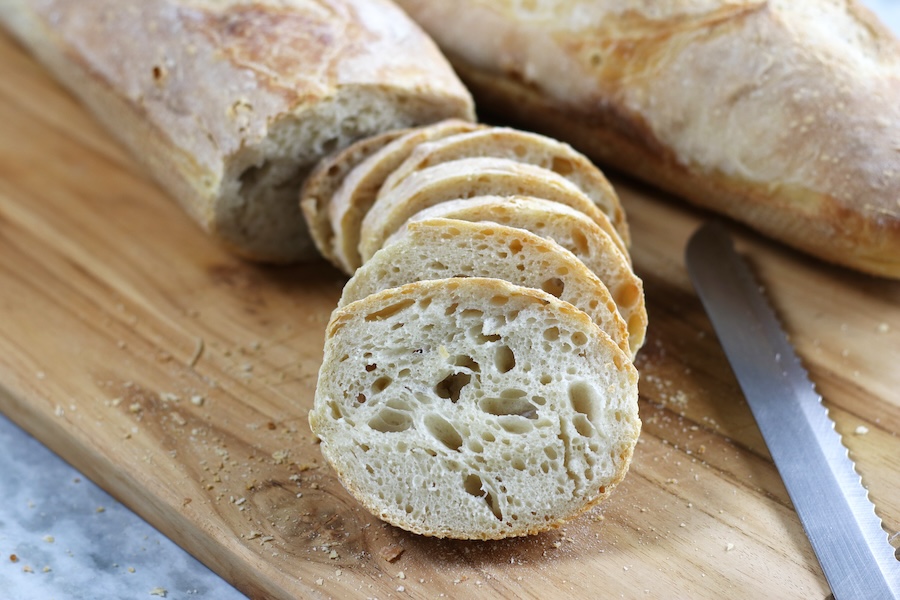
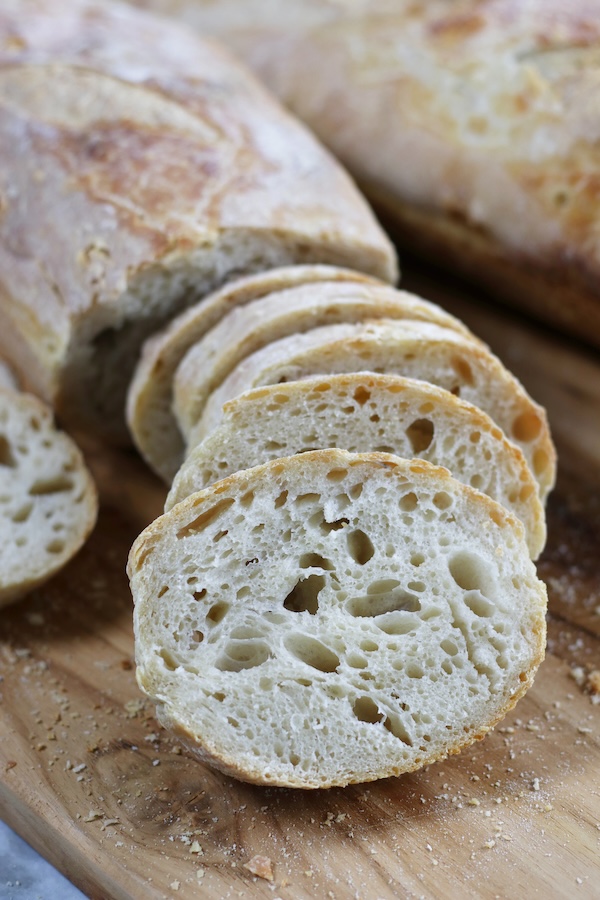
Sourdough French Bread
Soft and pillowy, this Sourdough French Bread recipe creates irresistibly tender insides, complemented by a crackly exterior that promises a satisfying crunch with every bite. Made with an Easy Homemade Sourdough Starter, this bread not only tantalizes the taste buds but also serves as the perfect initiation into the art of sourdough baking for beginners.
Easy Sourdough Starter for Beginners: Sourdough French Bread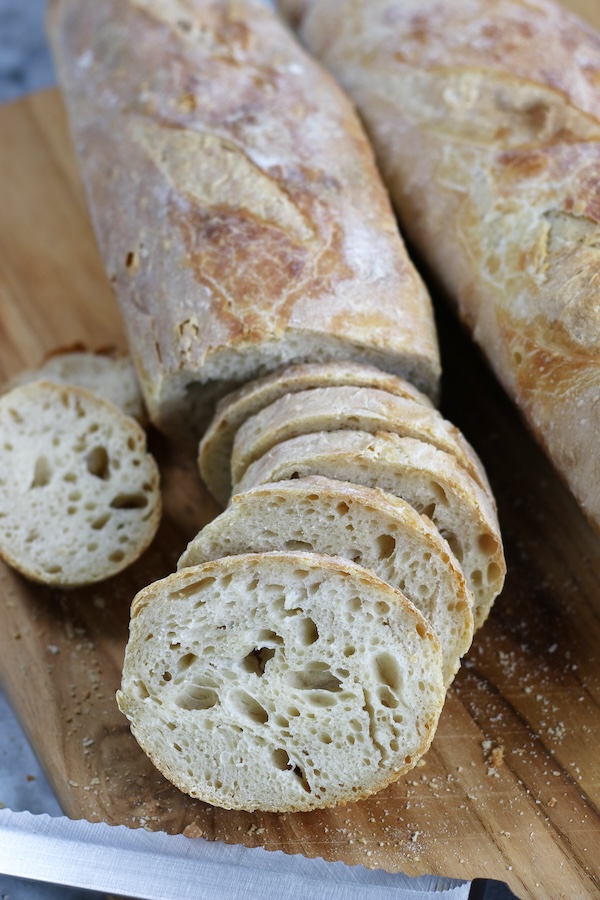
This post may contain affiliate links which I earn a small portion in sales if a purchase is made. Rest assured though, it is never at any additional cost to you.
Secret to Phenomenal Sourdough Bread
Making sourdough that has a crispy crust and a soft interior may feel daunting for beginners. Yet, the key to achieving exceptional sourdough is simple—cultivate a robust and well-fermented sourdough starter. To put it plainly, ensure your starter has been nourished for approximately 3-5 days before diving into the creation of Sourdough French Bread. This foundational step sets the stage for amazing homemade sourdough bread that feels very artisanal.
Did you know that you can easily create a sourdough starter from scratch with just flour and water? My Easy Sourdough Starter has proven to help countless novice sourdough bakers. Taking it one layer deeper, you will find all the questions and concerns about maintaining your starter for years of baking answered here.
Time Commitment for Homemade Sourdough
When beginning the process of homemade sourdough bread from scratch, it’s crucial to consider the overall time commitment to ensure a timely and satisfying outcome. While the process is remarkably straightforward, particularly if you’re initiating your starter from scratch, be prepared for a duration of 5-7 days to cultivate a mature starter. Once your starter is ready, making Sourdough French Bread extends over 2 days—allowing a day for dough preparation and baking on the subsequent day.
Alternatively, if working with a mature but unfed starter, allocate 3-5 days for starter preparation before delving into the 2-day bread-making endeavor. Keeping this in mind ensures that your homemade sourdough bread will be ready precisely when you desire it, whether you’re starting from the very beginning or using a well-established starter.
Note: To determine the optimal readiness of your sourdough starter for bread-making, I recommend checking out this detailed guidance on Maintaining Sourdough Starter.

Equipment Needed
- French Bread Pan
- 12-13 Quart Bowl Mixing Bowl
- Kitchen Scale
- Flat Surface or Large Cutting Board
- Bench Scraper
- Bowl (dough) Scraper
- Lame or Small Sharp Knife
Ingredients Needed
Making incredible homemade Sourdough French Bread only requires 4 simple ingredients.
- All Purpose Flour– The primary ingredient in this bread that provides sugars for the sourdough starter to feed on. Additionally, it provides the structure and texture of the bread.
- Water– Provides moisture, activates the gluten and helps to bind the ingredients together.
- Salt– Provides flavor to the bread.
- Sourdough Starter– Infuses the bread with its distinct tanginess and serves as the leavening agent, facilitating the rise of the bread. Note: Creating sourdough starter from-scratch is a very simple process. However, it requires about 7 days for the starter to mature before it’s ready for bread-making.
Mastering Homemade Sourdough French Bread
Mastering Dough Consistency
First and foremost, it’s essential to understand that sourdough dough typically has a high hydration level, resulting in a wetter consistency compared to traditional yeasted breads. While this might initially seem unusual for those accustomed to conventional baking, rest assured that this is perfectly normal.
Mastering the consistency of sourdough dough is essentially linked to the health of the sourdough starter. A robust starter will exhibit lively activity, with visible bubbles and a noticeable rise and expansion after feeding. This vitality is the cornerstone of crafting artisanal French bread at home. However, for beginners in sourdough baking, maintaining a healthy starter can feel daunting.
This is where my guide on How to Maintain Sourdough Starter comes into play, offering invaluable support and guidance for nurturing your starter and ensuring successful bread-making.
Understanding and Mastering Dough Fermentation
Fermentation is a vital step in making sourdough bread. It’s what makes the bread rise and gives it its unique taste. During fermentation, natural yeasts in the sourdough starter eat sugars in the dough, creating bubbles of carbon dioxide that make the dough expand.
To feel comfortable with the fermentation of sourdough bread, you need to know a few things. Temperature is crucial—warmer temperatures speed up fermentation, while cooler ones slow it down. Additionally, the hydration level of the dough affects fermentation, with wetter doughs fermenting more quickly.
Key Guidelines for Fermentation
The right amount of proofing (also known as fermentation or rising) for this sourdough French Bread recipe depends on factors such as temperature and activity of starter. However, here are a few general guidelines to help determine when your dough has proofed sufficiently:
- Volume Increase– During proofing, the dough should visibly increase in volume. It should roughly double in size from its original volume, indicating that fermentation has produced enough gas to leaven the dough.
- Visual Cues– Look for visual signs such as an increase in visual air bubbles and a smooth and shiny surface.
- Feel of the Dough– When the dough is adequately proofed it will feel light, bouncy and slightly elastic. Gently wiggling the bowl will cause the dough to jiggle slightly.
Importance of Oven Preheating for Baking Success
Preheating the oven for at least 30 minutes before baking homemade sourdough French bread is important for several reasons:
- Even Heat Distribution– It takes time for the entire oven cavity, including the walls and racks, to reach the desired temperature. Preheating for at least 30 minutes ensures that the heat is evenly distributed throughout the oven, which is crucial for consistent baking results.
- Proper Crust Formation– Achieving a crispy and golden crust on your sourdough French bread requires a hot oven. Preheating allows the oven to reach the high temperatures needed to create the desired crust texture and color.
- Oven Spring– During the initial stages of baking, the yeast in the sourdough starter becomes active, producing carbon dioxide gas. This gas expands the dough, resulting in what bakers call “oven spring” – the rapid rise of the dough in the hot oven. Preheating the oven ensures that the dough experiences immediate heat upon entering the oven, promoting optimal oven spring and a lighter, more airy crumb.
Advantages of Using a French Bread Pan
Homemade sourdough French bread absolutely can be baked on a cookie sheet lined with parchment paper. However, if you want to take your bread to the next level, try using a French bread pan. These pans have tiny holes that let air circulate while baking, ensuring your bread bakes evenly and achieves a gorgeous crispy crust. So, while purchasing a French bread pan might feel unnecessary, it really makes a big difference in how your bread turns out.
Benefits of Cooling Bread with Oven Door Ajar
Alongside using a French bread pan, another tip for achieving a stunningly crispy crust is to cool the bread in the oven after baking. By slightly opening the oven door at the end of baking, heat dissipates gradually, ensuring the bread cools slowly. This gradual process stabilizes the bread’s internal structure, minimizing the risk of it collapsing or becoming too dense. Moreover, it plays a role in creating the beloved crackly crust characteristic of sourdough.
Summary of Tips and Tricks
- For fluffy insides and a crispy crust on your sourdough, make sure your starter is fully fermented before baking. Look for bubbles and rising after feeding; that’s when it’s ready.
- If you’re used to baking homemade yeasted bread, expect a wetter dough with sourdough due to its higher hydration level.
- Preheat the oven for at least 30 minutes before baking to ensure proper crust formation and oven spring.
- Using a French bread pan can help ensure that the bread bakes evenly and achieves a gorgeous crispy crust.
- After baking, turn off the oven and let the bread cool with the door slightly open. This is another secret to achieving a beautiful crackly crust.
How To Make Sourdough French Bread
Dough Preparation Steps
- Prepare this Easy Homemade Sourdough Starter. Note: It will take approximately 1 week to create a healthy starter.
- In a large mixing bowl, combine 1,000 grams of flour and 770 grams of water. Stir well until fully incorporated. Cover the bowl with plastic wrap and let it rest for 45 minutes. (This step, known as autolyse, enhances the quality of the final product with minimal effort.)
- Add 20 grams of salt (adjustable up to 25 grams for personal preference) and 150 grams of sourdough starter to the mixing bowl. Tip: Slightly increasing the amount of starter by 10-30 grams won’t affect the outcome negatively. Mix the ingredients by hand until they are relatively well combined. Cover the bowl and let the dough rest for 30 minutes.
- After the resting period, gently pinch the edge of the dough, pulling it toward the center, and fold it into the center of the bowl. Repeat this process for approximately 1 minute, working around the circumference of the bowl. Cover the bowl and let it rest for another 30 minutes.
- Repeat the stretch, fold and resting process a total of 4 times.
- Allow the dough to proof at room temperature (ideally between 65-74℉) for approximately 12 hours or until it has doubled in size and bubbles have formed. Note: Cooler temperatures, approximately 60°F, necessitate about a 14 hour proofing period, whereas warmer temperatures around 80°F can lead to a significantly shorter proofing time, sometimes as brief as 3-4 hours.
Baking Steps
- Preheat oven to 425℉ for at least 30 minutes before baking bread.
- Spray French bread pan with cooking spray and lightly flour a flat surface.
- Use a dough scraper to transfer the dough from the bowl to a lightly floured surface.
- Pinch the edge of the dough and stretch and fold into the center a few times to tighten up the dough.
- Using a bench scraper or large sharp knife, cut the dough into 2 equal parts.
- Form the dough into French bread loaves and place them on a baking pan. Cover the loaves with a towel or plastic wrap coated with cooking spray, then let the dough rest for 20-30 minutes.
- Make 3-4 shallow cuts along the top of the dough using a small knife or bread lame, angling the blade slightly.
- Bake for 40-45 minutes or until the loaves achieve a golden brown color. After baking, turn off the oven but leave the French bread inside with the door slightly open for about 20-30 minutes. This technique helps create a crackly crust.
- Remove the bread from the pan and let cool completely before packaging.
Shaping Sourdough French Bread
Shaping your sourdough French bread is a key step in achieving that perfect crust and crumb. Here’s a beginner-friendly guide to help you through the process:
- Prepare Your Workspace– Make sure your work surface is clean and lightly dusted with flour to prevent sticking. Also, have your proofed dough ready to go.
- Transfer Dough to Flour Surface– Using a dough scraper, gently transfer your proofed dough onto the prepared work surface.
- Flatten the Dough– Gently pat your proofed dough into a rough rectangle shape. Be careful not to deflate it too much; you want to maintain those precious air bubbles that will give your bread its light texture.
- Roll the Dough– Starting from the top long edge, gently roll the dough away from you in one continuous motion. As you roll, tuck in the edges to create a tight log. Aim for a uniform thickness throughout the log.
How To Store Sourdough French Bread
- Cool Completely– Allow your sourdough French bread to cool completely at room temperature after baking. This helps to ensure that excess moisture evaporates from the bread, preventing it from becoming soggy when stored.
- Wrap and Store at Room Temperature– Once cooled, wrap the bread tightly in a clean kitchen towel or parchment paper. Avoid using plastic bags or plastic wrap, as they can trap moisture and make the crust lose its crispness. If you plan to consume the bread within a day or two, simply leave it wrapped at room temperature. Sourdough bread tends to stale more slowly than bread made with commercial yeast.
- Freezing– If you won’t be consuming the bread within a couple of days, you can freeze it for longer-term storage. Slice the bread first if you prefer, then wrap it tightly in plastic wrap or aluminum foil before placing it in a freezer bag. Properly wrapped, sourdough bread can last for several months in the freezer without significant loss of quality.
- Reheating– When you’re ready to enjoy the bread, thaw the frozen loaves at room temperature. Reheat either the slices directly in a toaster or the loaves in a preheated oven. This helps to revive the crust and maintain the bread’s texture.
Troubleshooting Tips: Overcoming Common Sourdough Challenges
New sourdough bakers often encounter challenges, which is entirely normal. Below are some of the most common hurdles with baking Sourdough French Bread and how to overcome those challenges.
Inconsistent Rise {aka Sourdough Starter Issues}
When facing recurring issues with your sourdough bread, it’s crucial to reassess the health of your sourdough starter. A vibrant starter, characterized by its bubbliness and increased volume, is essential for successful sourdough baking. My Easy From Scratch Sourdough Starter has been instrumental in guiding numerous beginners into the world of sourdough baking. Additionally, explore the guide on How To Maintain Sourdough Starter for long-term success in crafting gorgeous sourdough loaves.
Dense Texture
There are several potential reasons for dense-textured homemade sourdough bread.
- Under Proofing– If the dough hasn’t been allowed to ferment and rise adequately, it can result in a dense texture. Note: See Key Guidelines for Fermentation section above to know when your dough has adequately proofed.
- Over Proofing– Conversely, if the dough is left to proof for too long, it can become overly expanded and collapse during baking. This can lead to a dense crumb. Note: Typically, this recipe requires an overnight proofing period. However, in warmer weather or with a particularly vigorous starter, proofing may be completed in as little as 5 hours.
- Inadequate Gluten Development– Insufficient gluten development can result in a weak dough structure. This can lead to a dense crumb due to the inability to trap enough gas produced by fermentation. The remedy for this issue in this recipe is to ensure proper stretching and folding during the doughs preparation stage.
- Insufficient Oven Spring– Oven spring is the final burst of expansion in the oven due to a properly preheated oven. Make sure to preheat the oven for at least 30 minutes to promote maximum oven spring.
Gummy Interior
While it can be frustrating, encountering a gummy interior is a common experience for novice sourdough bakers. Even seasoned bakers may face this challenge occasionally, despite their experience. Here are a few reasons this happens and solutions:
- Underbaking– One of the most common reasons for a gummy interior is underbaking. If the bread is removed from the oven before the interior has had enough time to fully cook, it will remain doughy and gummy. To prevent this, ensure the bread is baked for the full recommended time. It should have check a golden brown crust and hollow sound when tapped on the bottom to confirm doneness.
- Overly Hydrated Dough– Sourdough bread typically requires a high hydration level. However, it’s possible to inadvertently add too much water during preparation. Ensure precise measurements by accurately weighing both the flour and water, remembering to tare the scale between each addition.
- Insufficient Oven Spring– If the bread doesn’t receive enough oven spring during baking, the interior may end up dense and gummy. To prevent this, ensure the dough is proofed sufficiently before baking. Also, make sure the oven has been preheated for at least 30 minutes before baking.
- Poor Fermentation– Inadequate fermentation can also lead to a gummy texture in sourdough bread. If the dough hasn’t fermented long enough or if the starter is weak, the bread may not rise properly and the interior may remain undercooked. The solution is to allow the dough to ferment for the full recommended time, and maintain a healthy and active sourdough starter to ensure proper leavening.
Lack of Sourdough Flavor
Creating a robust sourdough flavor in homemade bread is a key indicator of successful sourdough baking. However, it is not uncommon for novice bakers to encounter challenges with this along the way. Here are a few potential reasons for a lack of sourdough flavor and their corresponding solutions:
- Under Fermentation– Insufficient fermentation time can result in a milder sourdough flavor. Make sure to allow the dough to ferment for the full amount of time. Also, allowing the dough to ferment in the refrigerator, a process known as “retardation,” can enhance the sourdough flavor. Retardation slows down the activity of yeast and bacteria, allowing them to develop more complex flavors over an extended period. This slow fermentation process also promotes the production of acids that contribute to the characteristic tanginess of sourdough bread.
- A Young or Weak Starter– A starter that is not sufficiently mature or active may result in a milder sourdough flavor. In essence, a young starter might not yet possess the fully developed sourdough taste. Ensuring your starter is fully active before using it in bread-making is crucial. With time and maturation, the starter will gradually develop the classic sourdough flavor.
- High Ambient Temperatures– Warmer temperatures can accelerate fermentation, resulting in a shorter proofing time and a milder sourdough flavor. Consider adjusting the proofing temperature by placing the dough in a cooler environment.
Sticking to the Pan
From time to time you may deal with the frustration of your French bread loaves sticking to the pan. Here are some potential reasons and their solutions:
- Insufficient Greasing– If the pan isn’t adequately greased, the bread may stick to the surface during baking. The best way to prevent this is to make sure to spray the pan generously with cooking spray before placing the dough in it. Note: If baking on a cookie sheet with parchment paper, there is no need to grease the pan.
- Over Proofing– If the dough is over proofed, it can become too soft and sticky, increasing the likelihood of sticking to the pan. Monitor the proofing time carefully and bake the bread before it becomes overly proofed.
- Lack of Proper Cooling– When the bread is not allowed to cool properly in the pan before removing it, it may stick to the pan due to residual steam and moisture. To prevent sticking and help in giving the bread a gorgeous crackly crust, turn off the oven after baking but leave the French bread inside with the door slightly open for about 20-30 minutes.
- Underbaking– If the bread is not baked for a sufficient amount of time, it may not release from the pan easily. Make sure to bake the bread for 40-45 minutes or until golden brown.
Uneven Baking
Uneven baking with homemade sourdough French bread can be attributed to several factors, each requiring specific attention to ensure a perfectly baked loaf. Here are some potential reasons and their solutions:
- Uneven Oven Temperature– Fluctuations in oven temperature or hot spots within the oven can result in uneven baking, with some parts of the bread cooking faster than others. In situations like this it is best to use an oven thermometer to verify the accuracy of your oven’s temperature and adjust the temperature accordingly. Also, if you find there are hot spots, rotate the bread halfway through baking to promote even heat distribution. Note: Generally speaking, it is best to not open the oven door while baking except in cases where rotating the bread is necessary to achieve uniform browning.
- Improper Shaping– If the dough is not shaped evenly or if there are inconsistencies in the loaf’s size and thickness, it may bake unevenly. This is a very common challenge for new bakers. See video for guidance in shaping techniques.
- Incorrect Positioning in the Oven– Placing the bread too close to the oven’s heating element or too far away from it can result in uneven baking. Make sure to position the bread in the center of the oven, where it can receive even heat from all sides.
- Underbaked Loaf– If the bread is removed from the oven before it’s fully baked, it may have an uneven texture and color. The easiest solution is to bake the bread for the full 40-45 minutes or until golden brown.
Lack of Spring
When making homemade sourdough bread oven spring refers to the rapid rise and expansion of dough during the initial stages of baking, leading to increased volume and a lighter, airier texture in the finished bread. Achieving a good oven spring is essential for creating beautifully risen and airy homemade sourdough French bread. Below are potential reasons for a lack of spring and their corresponding solutions:
- Under Proofing– If the dough is not proofed sufficiently before baking, it may lack the necessary structure to expand properly in the oven. Make sure the dough is proofed until it has doubled in size and bubbles have formed. Adjust proofing time as needed based on ambient temperature and dough activity.
- Cold Dough– If the dough is too cold when placed in the oven, it may not have enough energy to undergo significant oven spring. If proofing in the refrigerator, allow the dough to come to room temperature before baking.
- Inadequate Gluten Development– Weak gluten structure can hinder the dough’s ability to expand and hold its shape during baking. Ensure proper gluten development by not skipping the stretch and fold techniques during bulk fermentation.
- Over Handling the Dough– Excessive shaping or handling of the dough can degas it, reducing its ability to spring in the oven. Handle the dough gently during shaping and avoid excessive deflation, allowing it to retain as much trapped gas as possible for oven spring.
- Not Preheating the Oven Sufficiently-Not preheating the oven for at least 30 minutes can result in less rise and a denser crumb in your sourdough bread. Ensure adequate preheating before baking to optimize the yeast activity and achieve that coveted airy texture.
Frequently Asked Questions
Can you freeze sourdough bread?
Yes, homemade sourdough bread can be frozen to preserve its freshness. For whole loaves, tightly wrap the completely cooled loaf in plastic wrap or aluminum foil, then store in a freezer bag or airtight container. For sliced bread, place the slices in a freezer bag, label, and date before freezing. When ready to enjoy, simply thaw at room temperature, or toast frozen slices directly in a toaster for a quick preparation. For an extra touch of freshness, reheat thawed slices in a preheated oven at 350°F (175°C) for 10-15 minutes.
Why is scoring the bread necessary?
Scoring the bread not only controls dough expansion during baking but also promotes even baking and rise. While a healthy starter and well-fermented dough are key factors, achieving a beautiful loaf is still possible without scoring. However, it’s advisable to always score the bread for optimal results.
Is it cheaper to buy or make sourdough bread?
Making sourdough bread at home is generally cheaper than buying it. While initial investments like purchasing flour and maintaining a sourdough starter may seem costly upfront, the overall cost per loaf is typically lower compared to buying artisanal sourdough bread from a bakery.
What all can be done with homemade sourdough French bread?
- Classic Sourdough Bread Slices– Enjoy slices of the French bread on its own, with butter or dipped into a balsamic and olive oil mixture as a simple and satisfying snack.
- Breakfast Toast– Toast slices of the bread and top them with avocado, soft boiled eggs, tomatoes, or your favorite spread for a hearty breakfast or brunch option.
- Sandwiches– Use the sourdough French bread to make sandwiches with a variety of fillings such as thinly sliced Oven Roasted Tri Tip, cheeses, veggies, and spreads for a flavorful lunch or dinner.
- Bruschetta– Slice the bread, toast it, and top it with this crowd pleasing Bruschetta that showcases the vibrant flavors of the Mediterranean.
- Croutons– Using this bread to make homemade croutons makes a delicious addition to Chicken Caesar Salad.
- Sourdough French Toast– Sourdough bread is an excellent choice for French toast due to its sturdy texture and tangy flavor that compliments the sweetness.
- Panzanella– Tear the bread into bite-sized pieces, toast them, and toss with fresh tomatoes, cucumbers, onions, basil, olive oil, and vinegar for a flavorful Italian bread salad.
- Garlic Bread– This bread makes wonderful Garlic Bread with either an olive oil or butter base.
- Olive Oil Toast– Serve Marinated White Beans over olive oil toast and topped with freshly grated parmesan cheese for a delicious appetizer or light meal.
- Bread Crumbs– Leftover or stale bread is perfect for making homemade breadcrumbs that can be used for coating for fried foods, a topping for casseroles, or a binder for meatballs or meatloaf.
I don’t want to use cooking spray on the French bread pans. Is there an alternative?
When using a French bread pan, a light coating of oil may replace the cooking spray. The easiest way to coat the pan when using oil is with a pastry brush.
Does adding salt slow the fermentation of the dough?
Yes, salt regulates fermentation. Excessive salt can hinder yeast activity. However, the right amount enhances flavor without significant impact.
How do I handle the longer fermentation time with my schedule?
For those with busy schedules, refrigerating the dough is ideal. After the stretch and fold stage is completed, cover the dough and place it in the refrigerator. This slows down fermentation, allowing flexibility in baking time. The dough can typically be refrigerated for up 48 hours before baking, depending on the fermentation rate. Before baking, remove the dough, let it come to room temperature, then proceed as usual. Refrigeration enhances flavor development, making it a convenient option for busy bakers.

Sourdough French Bread
Ingredients
- 1000 grams all purpose flour
- 770 grams water
- 20 grams salt
- 150 grams sourdough starter *see Note #1 below
Instructions
Dough Preparation
- Mix 1,000 grams of flour and 770 grams of water in a large bowl until fully combined. Cover with plastic wrap and rest for 45 minutes. See Note #2 below.
- Incorporate 20 grams of salt (adjustable up to 25 grams) and 150 grams of sourdough starter into the mixing bowl. Mix the ingredients by hand until they are relatively well combined. Cover the bowl and let the dough rest for 30 minutes.
- After the resting period, gently pinch the edge of the dough, pulling it toward the center, and fold it into the center of the bowl. Repeat this process for approximately 1 minute, working around the circumference of the bowl. Cover the bowl and let it rest for another 30 minutes.
- Repeat the stretch, fold and resting process a total of 4 times.
- Allow the dough to proof at room temperature (ideally between 65-74℉) for approximately 12 hours or until it has doubled in size and bubbles have formed. See Note #3 below.
Forming and Baking
- Preheat oven to 425℉ for at least 30 minutes before baking bread. See Note #4 below.
- Spray French bread pan with cooking spray and lightly flour a flat surface. Use a dough scraper to transfer the dough from the bowl to a lightly floured surface.
- Pinch the edge of the dough and stretch and fold into the center a few times to tighten up the dough.
- Using a bench scraper or large sharp knife, cut the dough into 2 equal parts.
- Shape the loaves by first flattening the dough. Fold and roll the dough tightly starting with the top. Place loaf into pan with seam side down. See Note #5 below for more shaping details.
- Cover the loaves with a towel or plastic wrap coated with cooking spray, then let the dough rest for 20-30 minutes.
- Make 3-4 shallow cuts along the top of the dough using a small knife or bread lame, angling the blade slightly.
- Bake for 40-45 minutes or until the loaves achieve a golden brown color. After baking, turn off the oven but leave the French bread inside with the door slightly open for about 20-30 minutes. This technique helps create a crackly crust.
- Remove the bread from the pan and let cool completely before packaging.
Video
Notes
- Prepare Your Workspace– Make sure your work surface is clean and lightly dusted with flour to prevent sticking. Also, have your proofed dough ready to go.
- Transfer Dough to Flour Surface– Using a dough scraper, gently transfer your proofed dough onto the prepared work surface.
- Flatten the Dough– Gently pat your proofed dough into a rough rectangle shape. Be careful not to deflate it too much; you want to maintain those precious air bubbles that will give your bread its light texture.
- Roll the Dough– Starting from the top long edge, gently roll the dough away from you in one continuous motion. As you roll, tuck in the edges to create a tight log. Aim for a uniform thickness throughout the log.